
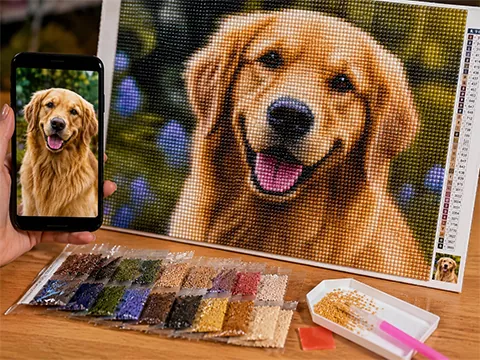
Uncategorized
What Is Diamond Painting? Complete Beginner’s Guide
What Is Diamond Painting? The Complete Beginner’s Guide
If you’ve seen those glittering, mosaic-like artworks and wondered how they’re made — this is your one-stop guide. We’ll cover what diamond painting is, how it works, what’s in a kit, the jargon (5D, full drill, square vs round), sizes, timing, the mistakes beginners make, and exactly how to start.
What is diamond painting?
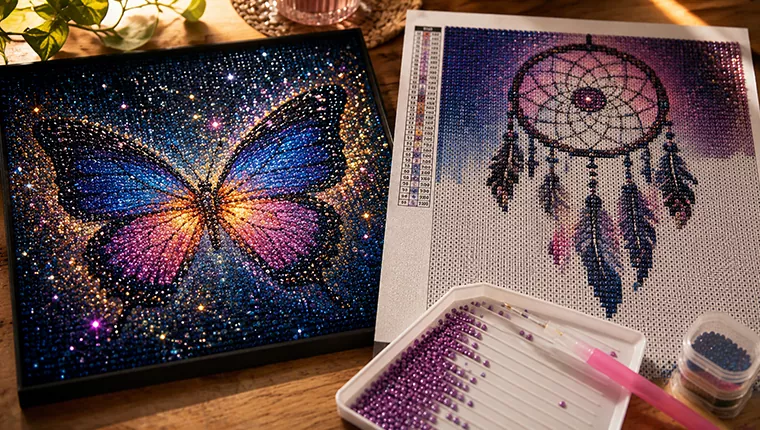
Diamond painting is a relaxing craft where you place hundreds of tiny, sparkling resin “diamonds” (called drills) onto a pre-printed, self-adhesive canvas. Each drill matches a coded symbol on the canvas, and together they build a shimmering, mosaic-like picture. It blends the ease of paint-by-numbers with the sparkle of mosaic art.
So when people ask what diamond painting is, the short answer is: it’s the calmest kind of colour-by-number, with sparkle instead of paint. Think part cross-stitch, part paint-by-numbers, part mosaic — but with none of the skill barriers. There’s no drawing, painting or sewing. If you can match a symbol to a colour, you can make something genuinely beautiful. That accessibility is exactly why the craft has become a worldwide favourite (we cover its rise in the story of diamond painting).
How does diamond painting work?
You peel back a small section of the protective film on the adhesive canvas, dip the applicator pen in wax, use it to lift a drill, and press the drill onto its matching symbol. You work one colour at a time until the whole picture is filled, then seal and display it.
The canvas is printed with a chart — a grid of symbols, each mapped to a colour code, just like a paint-by-numbers or cross-stitch pattern. The surface is pre-glued and covered with film, so drills stick instantly the moment you place them. It’s rhythmic, forgiving, and oddly meditative. The one habit worth building early: only peel back a small patch of film at a time. Expose the whole canvas and the exposed glue collects dust and lint, and it goes tacky before you reach it. For a full walkthrough, see our how to diamond paint guide.
What’s in a diamond painting kit?
A diamond painting kit includes a pre-printed adhesive canvas, bags of colour-sorted resin drills (with a few extras), a wax-tipped applicator pen, a lump of placing wax, and a drill tray. That’s everything you need — no extra tools to buy.
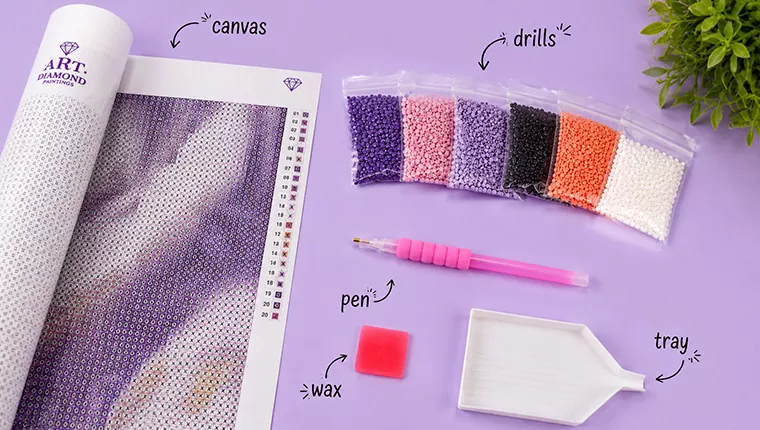
Each drill bag is labelled with a DMC-style colour code that matches the chart and the legend printed on the canvas — that’s how you know which sparkle goes where. Every Art Diamond Paintings kit arrives complete, and we include a little extra of each colour. If you ever run short — spill a bag, lose a few down the sofa — we resend replacement drills free, for life, so a missing colour never strands a project.
What is 5D diamond painting?
“5D” refers to the number of facets cut into each resin drill. 5D drills typically have around 15–20 facets (about 5 per side), so they catch and reflect more light than older flat “2D” or “3D” drills — making the finished piece noticeably brighter and sparklier. It’s largely an industry marketing term for higher-sparkle drills.
In practice, most modern kits — including ours — use 5D drills, so you don’t need to hunt for the label. It simply means “the sparkly kind.” What actually varies between suppliers is quality: how colour-true the resin is, and how evenly the facets are cut. Muddy, off-colour drills are the real reason some finished pieces look flat, which is why we hold our drills to a colour-true standard rather than chasing a bigger number on the box.
Full drill vs partial drill — what’s the difference?
Full drill means the entire canvas is covered in drills for maximum, edge-to-edge sparkle. Partial drill covers only the main subject over a printed background, so it’s quicker to finish but less dazzling. Full drill gives the “wow”; partial drill is faster and beginner-friendly.
| Full drill | Partial drill | |
|---|---|---|
| Coverage | Whole canvas | Subject only |
| Sparkle | Maximum | Moderate |
| Time | Longer | Faster |
| Best for | Statement art, gifts | Quick projects, first-timers |
Our kits are full drill unless a product says otherwise, because that gallery shimmer is the whole point. A partial-drill piece can look lovely, but the printed background never catches light the way resin does, so the finished result reads more like a poster with a sparkly centre.
Square vs round drills — which is better?
Square drills tile edge-to-edge with no gaps for a crisp, fully-covered, sharp-lined finish — great for portraits and detail. Round drills are a little quicker and easier to place and give a softer, slightly sparklier look — often preferred by beginners. Neither is “better”; it’s about the finish you want.
A handy saying in the community: “round for relaxation, square for precision.” Square drills snap into place with a satisfying click and leave no gaps, but they’re less forgiving — a crooked one stands out. Round drills sit in a small dot of space, so slight wobbles disappear. For a custom portrait where sharp facial detail matters, square usually wins; for an easy, breezy first project, round is lovely.
What sizes does diamond painting come in?
Kits range from small minis up to large statement canvases. Bigger canvases hold more drills, so they capture more detail — important for faces and busy scenes. Small kits are faster and beginner-friendly; large kits are best for portraits and detailed art.
Our own kits come in 30×40, 40×50 and 50×60 cm, plus 40×40 and 50×50 cm squares — a range chosen to cover a first-timer’s weekend project right up to a framed statement piece. Size is the biggest single factor in how good a finished piece looks, because a small canvas simply can’t hold enough drills to render a detailed face cleanly. Our full size guide compares detail levels and typical drill counts so you can pick with confidence.
How long does a diamond painting take?
It depends on size and detail. A 30×40cm full-drill canvas takes roughly 8–20 hours; a 40×50cm around 20–50 hours; and larger, busier pieces can take 50+ hours. Most people finish a standard kit over 2–3 weeks working an hour or two a day.
But there’s no clock. Part of the appeal is that you can do ten calm minutes or a whole absorbing evening — it’s meant to be unhurried. Fewer distinct colours and larger blocks of one shade go faster; tightly detailed scenes with dozens of colours take longer per square inch.
Is diamond painting hard? Is it good for beginners?
Diamond painting is very beginner-friendly. There are no artistic skills required — you simply match numbered drills to symbols. Beginners do best starting with a smaller canvas and round drills, then working up to larger, more detailed pieces.
It’s also one of the most calming hobbies around: repetitive, screen-free and quietly satisfying. Many people use it exactly for that — see diamond painting for stress relief. Ready to level up? Our 20 tips & tricks cover neater rows, straight edges and common fixes.
Common beginner mistakes (and how to avoid them)
None of these are serious — the craft is forgiving — but knowing them up front saves a lot of small frustrations on your first canvas.
- Peeling off all the film at once. The exposed adhesive grabs dust and lint and goes tacky. Uncover only the small area you’re working on.
- Overloading the wax. A tiny dab is enough; jamming the pen deep into the wax gums up the tip and starts leaving wax on the drills. Refresh it lightly and often.
- Not pressing rows flat as you go. Every so often, run a roller or a flat card over finished sections so each drill beds firmly into the glue and stays put.
- Placing drills upside down. Faceted side up, always — the flat side is the glued side. It sounds obvious, but a whole tired-evening row facing the wrong way is a classic.
- Skipping the tray shimmy. A gentle shake settles round drills faceted-side up so the pen picks them cleanly, which roughly doubles your placing speed.
Diamond art vs diamond painting — are they different?
They’re used to mean the same craft. “Diamond painting” specifically describes placing resin drills on a coded adhesive canvas, while “diamond art” is a slightly broader umbrella term. For shoppers, the two are interchangeable.
What do you do with a finished diamond painting?
Most people seal and frame their finished diamond painting as wall art. You can also mount it “floating”, turn it into coasters or bags, or gift it. Sealing first (a brush-on or spray sealer) locks the drills and protects the sparkle from dust.
Before sealing, press the whole piece flat with a roller so every drill is firmly bedded. Then frame it — usually without glass, so the facets shine and don’t dull behind a reflective sheet — and enjoy. A finished piece is a genuine work of art you made by hand, which is exactly what makes it such a good gift.
How to get started with diamond painting
Getting started is simple:
- Pick a design you love — browse animals, florals, landscapes and more in the gallery, or turn a photo into a custom piece (we send a free digital proof and revisions before anything ships).
- Choose a beginner-friendly size (30×40cm is a great first canvas) — see the size guide.
- Follow the steps in our how-to guide and enjoy the calm.
So that’s what diamond painting is, start to finish: everything you need comes in the kit, every design is curated by hand — chosen, not dumped — and every order is backed by a 30-day guarantee, lifetime replacement drills, and honest tracked delivery. The best way to understand diamond painting is to make one, so pick a piece that makes you smile and give yourself the hour.
Keep reading: Custom diamond painting: 11 things to know · Tips & tricks · Stress relief & mindfulness · The story of diamond painting
